Template Workbench View
How the Template Workbench View edits a profile, the citation text, or a partial, and previews each one in Obsidian.
The Template Workbench View edits one template document and shows its output against data from your Zotero library.
One view, three kinds of document
The view opens all three kinds of template document. The kind decides the tabs, the tab title, and what the preview renders.
| Document | Tab title | Tabs | Preview |
|---|---|---|---|
| Profile | The profile's name, then Profile | Six | A literature note for one paper |
| Citation text | Citation text | One, Citation | One inserted citation |
| Partial | The partial's name, then Partial | One, Partial | The partial as one template calls it |
Everything you type is previewed, including bytes you have not saved yet. Editing uses Obsidian's automatic saving, with its Undo and Redo. A document with an error stays editable and saves with its diagnostics shown in the editor.
The native Markdown view keeps working on the same file. Select Open as Markdown to open the document as Markdown, and right-click a template document in the file explorer for Open template workbench.
Select Help in the view header for Template guide, Template syntax, Template data reference, and Ask the community. The web Workbench has the same Help menu in its header.
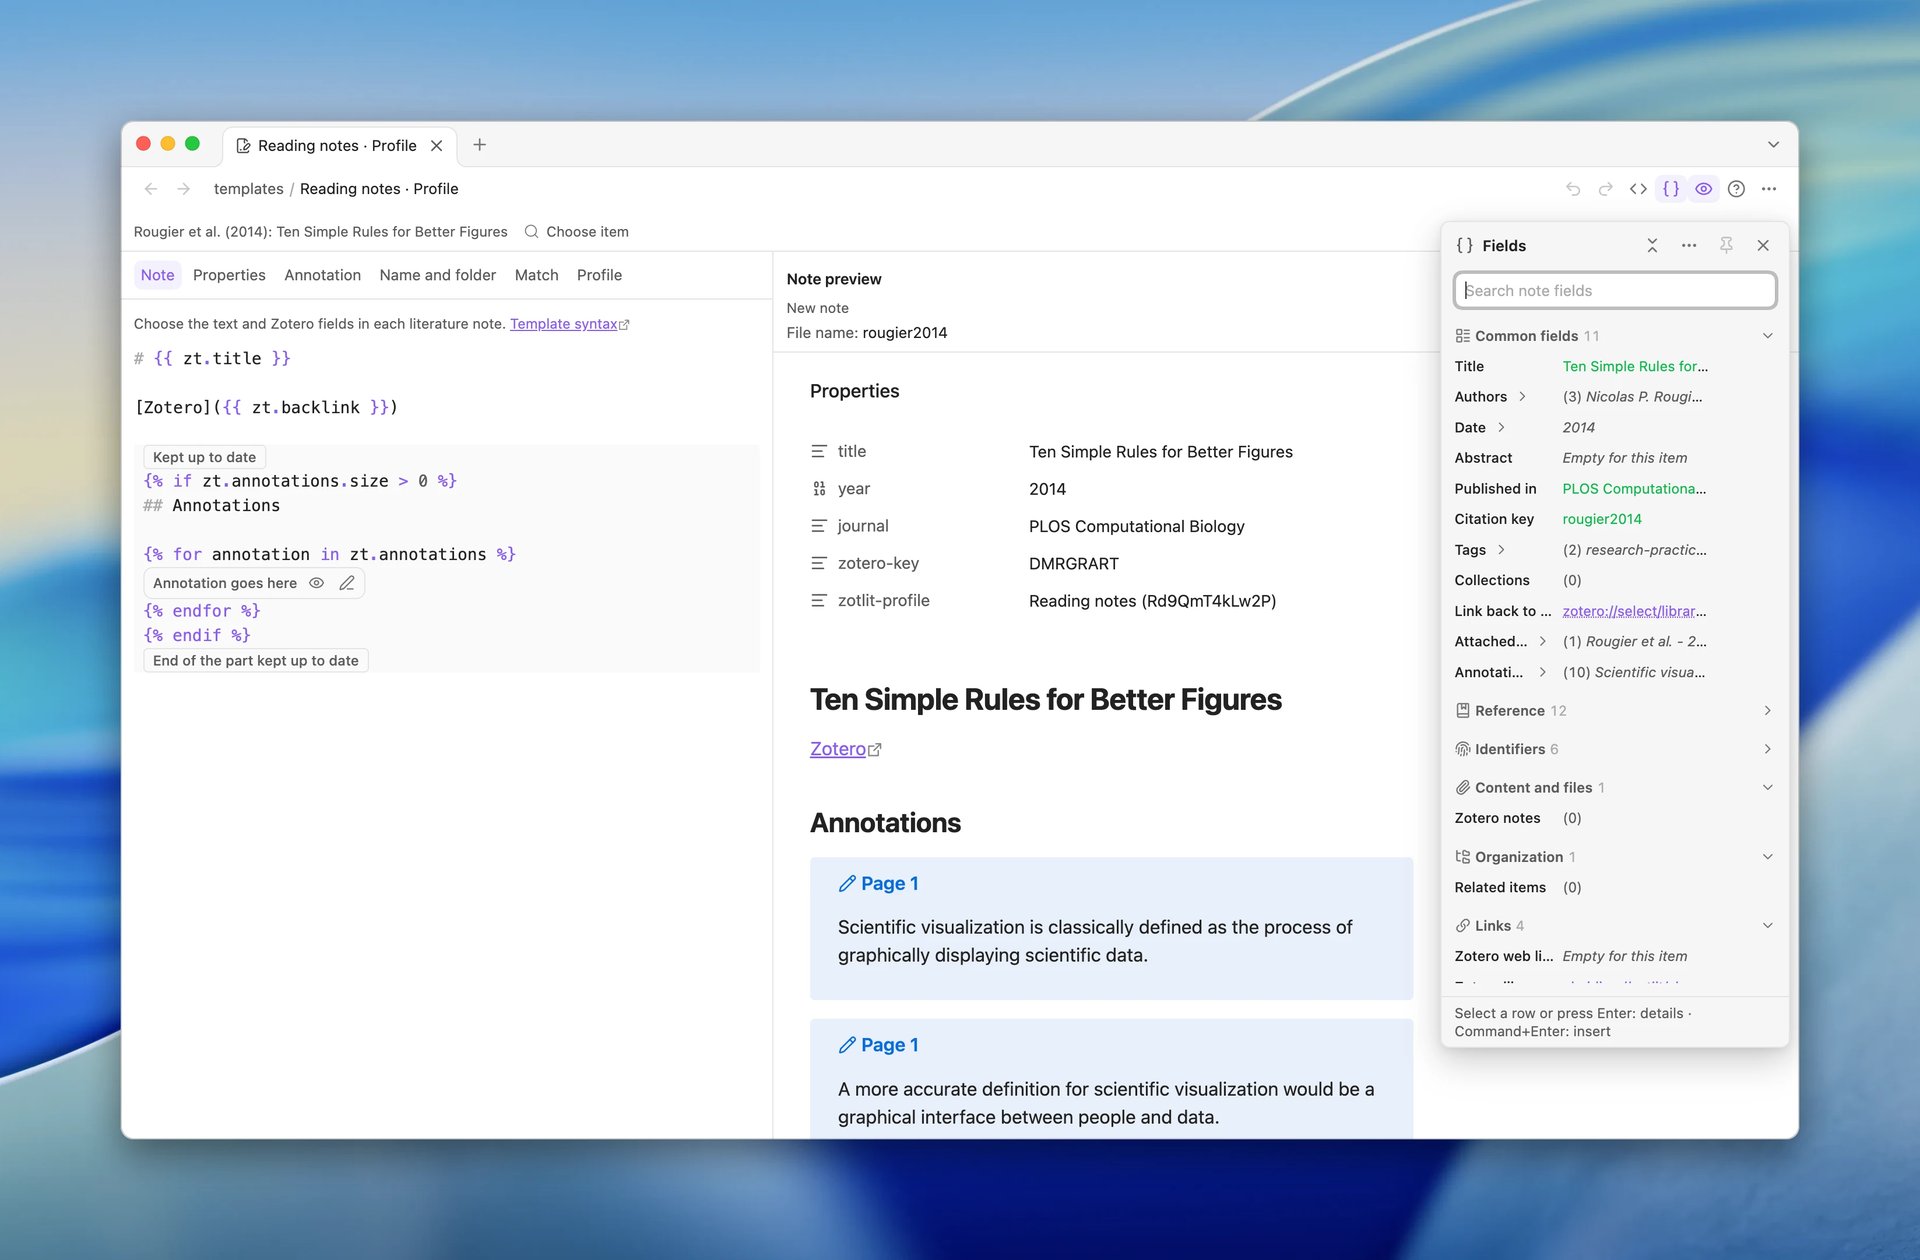
The Preview and Fields panels
The view has two panels beside the editor. The Preview panel shows what the document produces for the chosen paper. The Fields panel lists the template data for that paper. It opens as the Fields popover over the editor, or you can pin it as a column beside the editor. Both panels are available for a profile, the citation text, and a partial.
The editor tabs, the Preview panel and the Fields panel use one chosen item and one chosen annotation. The row above the panels names that item, or the annotation while you edit an annotation template, and holds Choose item to change it. The pane menu has the same entry. The web Workbench names the item in the same row, with its own example chooser.
Show or hide the panels
Select Show preview in the view header to show the Preview panel. The action looks pressed while the panel is shown. Select it again to hide the panel. The same entry is in the view's pane menu, with a check mark while the panel is shown. The web Workbench has the same action in its header, and the same entry in its View menu.
Select Fields in the view header to open the Fields popover, and select it again to close it. While the Fields panel is pinned, the same action hides and shows it. The pane menu entry Show fields and the web Workbench's View entry of the same name do the same, with a check mark while the panel is open. See The Fields panel.
Hiding the Preview panel keeps your chosen item and annotation. The panel shows them again when you bring it back.
Resize the Preview panel
Drag the edge between the Preview panel and the editor to make the panel wider or narrower. The panel is at least 240 pixels wide. It can grow until the editor has 360 pixels left, so you can read a wide note beside its template.
The edge also works from the keyboard. Press Tab to focus it; a screen reader names it Resize preview.
| Key | Effect |
|---|---|
| Left Arrow or Right Arrow | Moves the edge 16 pixels in that direction |
| Shift and an Arrow key | Moves the edge 64 pixels in that direction |
| Home | Makes the panel as narrow as it can be |
| End | Makes the panel as wide as it can be |
Double-click the edge to give the panel its default width again.
In the web Workbench, you can also size the panel without the edge. In the View menu, point to Resize preview, and select Make wider, Make narrower, or Reset width. Each step is 64 pixels, and the menu stays open so you can take several steps. After each step, a screen reader reads the panel and its new size, such as "Preview: 464 pixels".
Panels in a narrow view
The Preview panel stands beside the editor in a view at least 896 pixels wide (56rem), so you can compare the template with its result as you edit.
In a view narrower than 896 pixels, the Preview moves under the editor. It takes 40% of the view's height at first. Drag the edge above it, or focus the edge and press Up Arrow or Down Arrow, to give it more or less height; Home and End set its smallest and largest share. Double-click the edge to give it 40% again. In the web Workbench's View menu, Resize preview then offers Make taller, Make shorter, and Reset height, in steps of 10%. The editor always keeps room for its toolbar, its tabs and at least five lines of your template; the Preview gets shorter first. Each step starts from the height you see. When the editor needs more room, it scrolls.
The Fields popover works the same at every width. A pinned Fields panel docks only where the view has room for it; see Pin the Fields panel.
Making the view narrower or wider moves the Preview and changes nothing else: the panel stays shown, and it gets its width back when the view is wide enough again. A popover you opened stays open, and a closed popover stays closed. The Preview keeps your place as it moves: the control you were on and the scroll position stay. A view you move to another window follows that window's width.
What the view remembers
Obsidian saves whether the Preview panel is shown, how wide it is, and its height under the editor, with the view. It also saves whether the Fields panel is pinned, whether you hid it, and how wide it is. After a restart, the view opens the way you left it. The Fields popover is not saved: it is closed when the view opens. The web Workbench keeps the pin and the width while the page is open.
Every way to open a template document opens it in the Workbench window and shows the Preview panel. When the window already shows the document, ZotLit brings it to the front. The Fields popover stays closed until you select Fields. These entry points open the Workbench:
- Open template workbench, from the command palette, the file menu of a template document or a literature note, or the header of a template document open as Markdown.
- Customize on the built-in Default profile.
- The Edit profile button beside a profile in ZotLit settings.
- ZotLit: Customize citation text, for the citation text.
A partial or the citation text that you open from the view's pane menu opens in a new tab of the same window.
The Fields panel
The Fields panel is the Template Data Explorer inside the view. It has the same filter, sections, roots, and copy actions. It opens in the Fields popover, or you can pin it beside the editor. Its content is the same in both places. Each section has a header with its icon, its name, and the number of fields in it. The header stays at the top while you scroll through its section. Select a header to close or open its section. The Collapse all sections button in the panel's header closes every section at once, and Expand all sections opens them again. When you type in the filter, every section with a matching field opens. Each row has an insert button, and its row menu has Insert field. Both put the field into the editor at your cursor.
Each row shows the field's name and the chosen paper's value on one line. A value that is too long ends with "…". The fields inside a list or another field stand a little in, behind a thin line. Select a row to see its details, and select it again to hide them. The details show the full value, the template path, and, under In your note, the text that goes into the template and what it writes for this paper. Use Insert or Copy to put that text into the editor or on the clipboard. Both close the details. In a view 600 pixels wide or wider, the details open beside the panel, level with the row. In a narrower view, they open in a bar at the foot of the panel, so the list does not move. Pointing at a row opens nothing.
A list field, such as the authors or the annotations, shows how many items it has and all of them on one line. When the items have their own fields, a chevron after the list's name opens one row for each of those fields, with its value for every item: the authors open to their first and last names, and the tags to their name and type. A list goes into your note with every item, so a note for a paper with three authors names all three. The details of a list show its values one per line, numbered. Under In your note, choose In one line to write the items on one line, separated by commas, or Each item to write each item on its own Markdown list line. Insert field on the row uses the first of these choices.
You can also use the keyboard in the filter. Press Down Arrow or Up Arrow to select a row, Enter to show its details, and Ctrl+Enter (Command+Enter on macOS) to insert it. When Enter opens the details, focus moves into them, so Tab reaches the form choice, Insert, Copy and Close details. Ctrl+Enter there inserts the form you chose. Escape closes the details and moves focus back to the filter.
Select a place outside the details, or press Escape, to close them. Escape first closes the details, then clears the filter, and then closes the popover. In the pinned panel, Escape stops after it clears the filter, because the panel stays.
The panel opens on the same root as the editor, such as the note fields or the annotation fields. The citation text shows citation fields, and a partial shows the fields of the caller you preview it as. You can move the panel to another root, for example to an annotation. When the editor's root or the chosen item changes, the panel follows the editor again.
While the Fields panel is open, Save template data as JSON in the pane menu saves the data of the root the panel shows. Otherwise it saves the data of the editor's root.
The More options button in the Fields panel's header has Choose item, Save template data as JSON for the root the panel shows, and Copy item key (or the annotation's key, on the annotation root).
The Fields popover
The Fields panel opens in the Fields popover until you pin it. The popover opens at the right edge of the view and fills its height. It looks the same at every width. The editor and the Preview panel stay usable while it is open, so you can read the preview and write in the template beside it.
Close the popover in any of these ways:
- Select Fields again.
- Select a place outside the popover.
- Select the popover's Close fields button.
- Press Escape.
The focus goes back to Fields.
Show problem in the Preview panel also closes the popover. The editor then shows the problem, with the focus on it.
Place your cursor in the template before you insert a field. Until you do, the panel shows Select a place in the template to insert a field.. Inserting puts the field at the cursor, closes the popover, and puts the cursor back in the editor after the field. To insert several fields in a row, hold Shift while you select the insert button, or press Shift and Enter on it. The popover then stays open.
Pin the Fields panel
Pin the Fields panel to keep your paper's data in view while you write. Select Pin to side in the popover's header. The popover closes, and the Fields panel stands as a column at the left edge of the view, before the editor (the right edge in a right-to-left language). The editor gets narrower to make room.
The pinned panel stays open while you type and insert fields. Inserting puts the cursor back in the editor after the field, and the panel stays where it is.
- Select Fields to hide the pinned panel and give its room to the editor. Select it again to show the panel. The pin stays.
- Drag the edge between the panel and the editor to resize the panel, from 240 to 480 pixels. The edge works from the keyboard as the Preview's edge does, and the pane menu has Resize fields.
- Select Unpin to unpin the panel. It opens in the Fields popover again.
The pinned panel needs a view that keeps the editor at least 360 pixels wide beside a panel of 240 pixels, after the Preview panel takes its column. In a narrower view, the pin is disabled with the tooltip Widen the view to pin, and Fields opens the Fields popover. A pinned panel shows the note Pinned · opens over the editor in narrow views there. When the view is wide again, the panel docks again. A view that gets narrow never opens the popover over your editor by itself.
The Template Data Explorer
Pane title and layout
The pane title starts with the selected data and ends with
Fields. Annotation titles show the type, page, and a short excerpt. Built-in examples are identified in the title; with no selection, the pane uses its generic name.
Full panels have selection actions in the header. Sidebars have a small selection control near the data. Right-click the pane header to access its menu in either layout.
The root the pane lists
The pane header names the root it reads: Note, Annotation, Note name, or Citation.
The root follows the part of the profile you are editing: the note body and its properties list the note root, the Annotation Section lists the annotation root, the manifest's filename value lists the note name root, and the Citation text lists the citation root.
The standalone explorer takes its root from the Template Workbench View beside it. When it is anchored at an annotation, a breadcrumb above the list reads Note root, and its back button, tooltipped Back to note root, returns the list to the note root.
To read one annotation's own fields from the note root, open the more-options menu on its row under zt.annotations and select Explore as annotation template data.
Sections
Common fields leads every root and holds the fields most templates use. A note root and a note name root group the remaining fields under Reference, Identifiers, Content and files, Organization, Links, and Zotero record. An annotation root groups them under Annotation, Source, Organization, Links, and Zotero record. A citation root has no other section yet.
Select a section heading to open or close that section. The button beside the pane's selection control opens every section or closes every one, tooltipped Expand all sections or Collapse all sections. The pane menu carries the same action.
Each top-level row shows a name a reader knows, and its raw path stays in the tooltip and in Copy path. Expand a row that holds an object or an array to read its members. A long value collapses to its first line until you select more; less folds it back.
Filter
Type in the search box to narrow the list. The box names the root it searches: Search note fields, Search annotation fields, Search note name fields, or Search citation fields.
A query matches field names, keys, and values by case-insensitive substring. Matching rows and their ancestor chains open automatically. When nothing matches, the list reads No matching fields. Clear the search to see all fields..
Which copy actions a row offers
Every row carries a menu. Open it from the row's action cluster, labelled Template actions, or right-click the row.
An array node offers Copy loop, and Copy joined where its elements join into text. Every other node offers Copy output and Copy if present.
With JavaScript templates on, the snippet items sit in two submenus, captioned "Liquid" and "Eta", so you can pick the syntax your template uses. With the gate off, the Liquid items appear directly in the menu.
The Preview panel
The Preview panel's header row names the preview, such as Note preview, and the note's File name. The row stays at the top while you scroll through a long preview, so you always see which note you are reading.
Two buttons sit at the end of the header row. The first switches the preview between reading view and Markdown source; its tooltip names the mode it switches to, Show Markdown or Show reading view. The second, More options, opens the preview choices below.
While the Preview panel is shown, the view's pane menu also adds the choices that shape the preview. For a profile, these are:
- Preview as new note, Preview as updated note, or Preview updated section only.
- Automatically refresh preview. Turn it off to render only when you select Run.
- Show Markdown, to read the note as Markdown source.
- Reload preview data, to load the item's data again.
The citation text and a partial add their own preview choices, described below. When you hide the Preview panel, these entries leave the pane menu, and the preview keeps your choices for the next time you show it.
A problem that the preview finds appears in the editor's Problems area.
A profile document
A profile controls the name, folder, properties, and body of a literature note. It can also define how annotations appear and which Zotero items use the profile automatically.
The view groups these parts into six tabs:
- Note edits the literature note body.
- Properties edits the YAML properties that ZotLit manages.
- Annotation edits the format of one annotation.
- Name and folder edits the note path, citation style, imported note settings, and template language. Its Note path group joins the literature note folder and the note name template, and previews the full path.
- Match selects the Zotero items that use an added profile automatically.
- Profile edits the profile's own name, description, and version.
Source is a toggle in the view header. Select it to show the whole profile document as Markdown source in place of the tabs, and select it again to return to the tabs. A citation text or a partial shows its source in its one tab, so the toggle is offered for a profile document only.
The Name and folder and Match tabs
On the Name and folder tab, the Note path group holds the Literature note folder, the Note name template, and a Preview of the full path the note gets, with .md. A slash (/) in the note name makes a subfolder in the folder. For the Default profile, change the folder in Settings > ZotLit. The Match tab reports Matches selected item or Does not match selected item for the selected item.
Preview data
The preview uses a Zotero item or built-in example. Opening the view from a literature note selects that note's item. The pane menu offers Choose item to change the preview data.
The preview changes as you edit. A database or citation-style warning can limit the preview, but you can continue editing the profile.
For annotation formatting, select Choose annotation. Search annotations from the selected item or try a highlight, underline, note, text, image, or ink example. Annotation examples keep their own parent item data; the note preview keeps its selected item.
One view holds one chosen item and one chosen annotation, whichever surface you choose them from. A second Template Workbench View keeps its own choice.
Saving changes
The built-in Default profile is read-only. You can read and select its values without creating a document. Customize creates its document in the configured template folder before editing becomes available, or opens the existing custom document.
If creation fails, the built-in values remain readable and an inline error offers a retry. Closing an untouched customization keeps the created document.
Existing literature notes keep their current content. Run ZotLit: Update literature note to apply the edited profile to the active note.
Edit the Markdown document
Select Open as Markdown to open an existing profile document as Markdown. Customizing the built-in Default creates its document before editing becomes available.
The citation text
The citation text opens on one Citation tab. Its tab title is the fixed Citation text.
The preview, headed Citation preview, renders one citation. Its caption names the variant being previewed, Main or Alternate. While the Preview panel is shown, the view's pane menu picks that variant. It also offers Use example for a set of built-in citation shapes or Choose item for one of your own Zotero items.
Show the Preview panel to see it. While the panel is shown, the view's pane menu offers Use example with six built-in citation shapes: One item, Two items, Item with page, Suppressed author, Prefix and suffix, and Annotation citation. It opens on One item.
Select Choose item instead to preview one of your own Zotero items, by citation key alone. That clears the example.
Switch between Preview main citation and Preview alternate citation from the same menu to check both branches of your template. The preview caption names the variant on show.
The Preview panel uses the variant and example you pick. See Customize the citation text for the steps.
A partial
A partial opens on one Partial tab. Its tab title is the partial's name, then Partial.
A partial has no data of its own: it renders with the data of whichever template calls it. So its preview, headed Partial preview, asks you which caller to render as. While the Preview panel is shown, the view's pane menu offers Preview as called from Note, Preview as called from Annotation, and Preview as called from Citation. It opens on Note, and remembers your choice per file. ZotLit never guesses the caller from the templates that call the partial.
While your vault holds a profile besides Default, the same part of the pane menu offers Use profile to preview against that profile's data. Saving a partial re-renders every open preview that uses it.
Create a partial from the editor
Select some template text, right-click it, and choose Extract to partial…. ZotLit moves the selection into the new document, leaves the matching call behind, and opens the new document in a split. In the template you extracted from, that is one undo step.
Partial Placeholder
In a profile's tabs, with Source off, a call with a plain quoted name (Liquid render or include, Eta include(...)) is drawn as a Partial Placeholder: a compact control carrying the partial's name, the rest of the arguments as written, Preview partial, and Edit partial. The preview arrow opens a read-only render of that partial below the line, using the data of the slice the call sits in. Put your cursor in the call and the placeholder turns back into plain source, so you can edit the arguments.
The five reserved names are never partial names, so none of them draws one: {% render "annotation" %} draws the annotation placeholder for the profile's annotation section, and a call on filename, note, content, or citation draws nothing. A call inside a fenced code block is prose about a call, and draws nothing either.
Renaming is an ordinary Obsidian file rename. ZotLit has no rename action and rewrites no calls, so every template that called the old name then marks its placeholder Missing. Select that marker to read the problem in the editor's Problems area, then edit the call or create the partial yourself.
A note that ZotLit writes through a template calling a partial your vault no longer holds is not written at all. ZotLit says which partial is missing and offers Open template workbench to open the document holding the failing call.
The document's language
Above the editor of a citation text or a partial, a caption names the document's language, Liquid or Eta (JavaScript). The caption reports; it does not switch.
The pane menu carries Change language, the switch between the two languages. ZotLit rewrites the manifest key alone and translates no source. See How templates work.
A profile document sets its language on the Name and folder tab instead, under Template language.
Open the view
A view edits one template document, and each kind opens from the place that holds it:
- A profile, from its row at Settings > ZotLit > Literature note profiles, or from the Templates and properties row at Settings > ZotLit.
- The citation text, from the Citation text row at Settings > ZotLit > Citations.
- A partial, from its row under Partials at Settings > ZotLit > Literature note profiles.
The profile a literature note already uses opens from that note.
Each of those rows carries its own control, and Customize a template names it and walks the steps.
See also
Customize a template
Edit a profile, the citation text, or a partial, and preview the result.
How templates work
The three kinds of template document and the two template languages.
Configure frontmatter properties
Add and edit YAML properties managed by a profile.
Template Workbench CLI
Let an agent inspect and test templates through the Obsidian CLI.
Last updated on